Some of what's New in
ReportMakerPRO
JUMP TO
SECTIONS BY CLICKING BELOW
New /
Improved Text Features
New
Image / Photo Features
New
Image / Photo Drawing Features
New
Fluke InfraRed Features
More
Resilient
Backwards
Compatible
Miscellaneous
Note
from the Developer
back
to top
ReportMakerPRO
Growing
My
name is Scott Stephen and I am the developer of ReportMakerPRO. I would
like to sincerely thank ReportMakerPRO users for there ongoing support over
the years, bringing great thoughts and ideas that has helped ReportMakerPRO
become what it is today. As many of you know, I have been working on a
contract with Lockheed Martin for the DoD over the last few years, but I am now back full
time on my own with ReportMakerPRO my primary focus. We have acquired
back 100% ownership and rights to ReportMakerPRO, so we are free to develop
without any restrictions.
YOUR
Input is VITAL
Most
features originate from User requests so this is the time to let us know what
you like, what you don't like, and what you would like to see in the
future. This release is just the beginning of good things to come!
We plan to rebuild from the ground up the way ReportMakerPRO handles lists,
comments and text libraries. You can look forward to a more straight
forward, intuitive way add dropdown lists, manage comments to be used anywhere
in any report! There will be improved, simple portability to distribute
your report templates to your team. We will also be adding capability to
connect with databases. Many improvements are planned for the text engine
and image engine, this release just includes a few. Let us know what your
thoughts.
Scott
Stephen
support@reportmakerpro.com
850.944.6744
Endless
Text Only and FreeStyle Pages back
to top
No
More One Page Limit
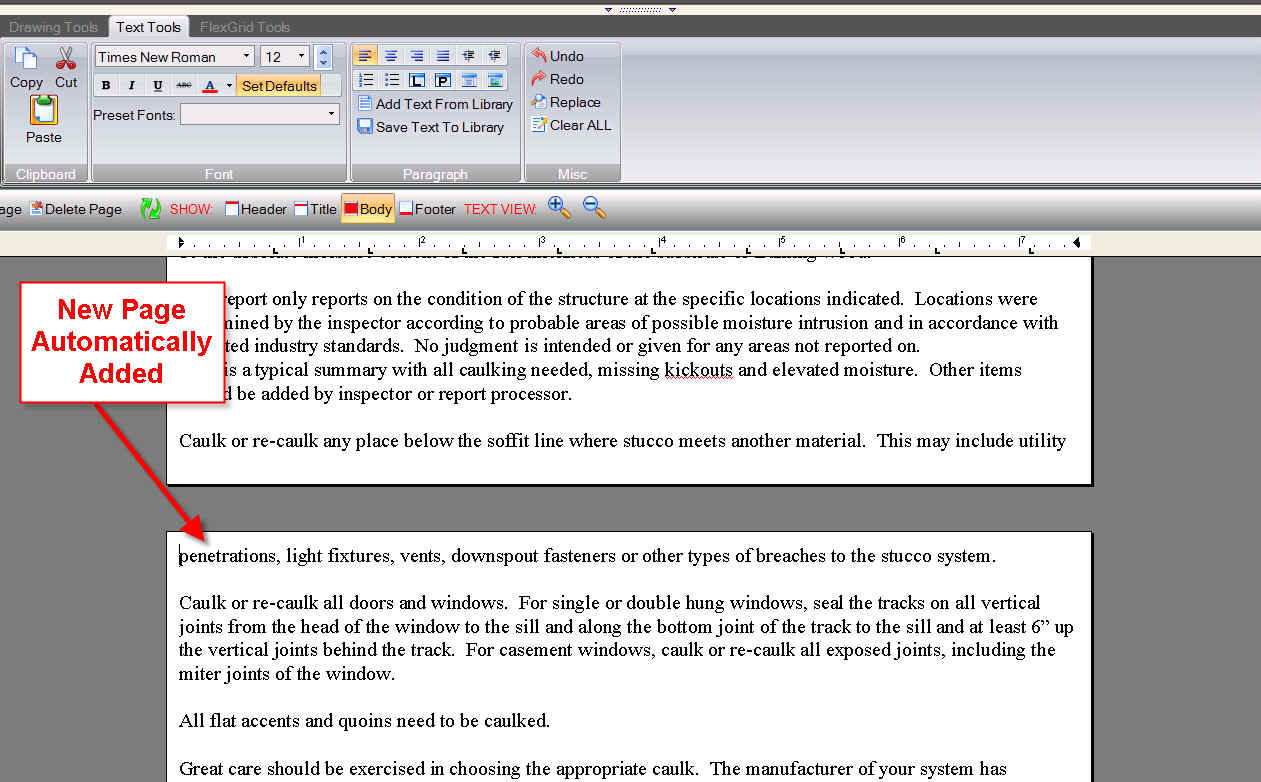
As
you know, previously you had to manually create a new page for each Text Page
if you needed more than one page. If you needed to add text, the text
did not carry over to the next page. Now Text Only & Freestyle pages
will automatically add pages as needed and the text will flow from page to
page. If you insert or delete text the text will automatically
shift across pages. You will see when a new page is added right in the
Text Editor (see Below)
Two
Options For Page Numbering
If
you have your Page Numbering Style set to 'Page 5 of 20' then the additional
pages will be numbered 'Page 5.1 of 20', 'Page 5.2 of 20', etc. If you just
use the simple page number style 'Page 5' then the pages will be
numbered in the order they occur ie Page 5, Page 6, etc.
Standard
Cntl Key Clipboard Funtions for Text Editor
back
to top
Now
the text editor accepts all normal Cntl + Key clipboard funtions as
follow:
Cntrl + C Copy to clipboard
Cntrl + V Paste from clipboard
Cntrl + X Cut and Copy to Clipboard
Cntrl + Z Undo (keep clicking - some undo's are just undo
cursor positions or spell checker)
Cntrl + A Select All text
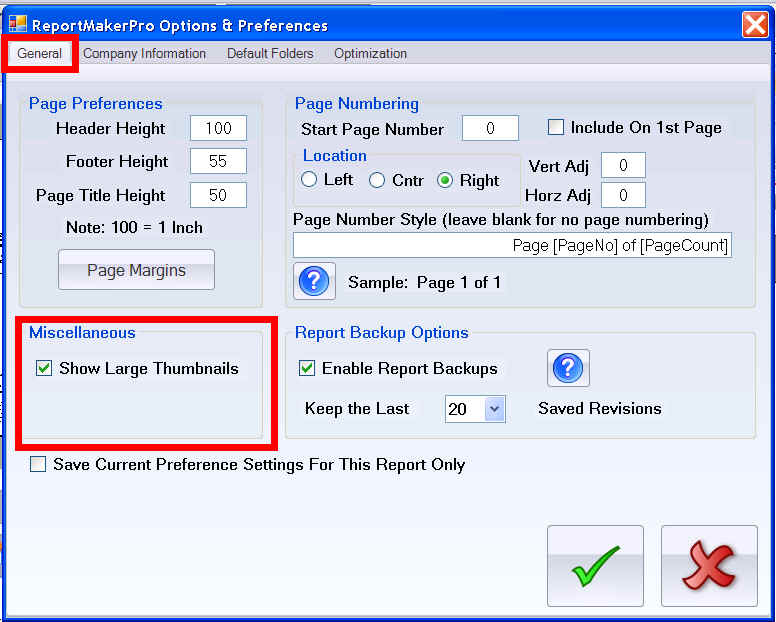
New
Report Default Fonts
back
to top
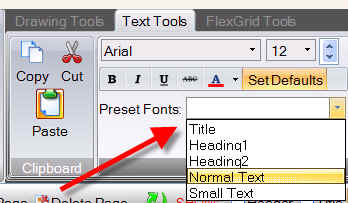
Set
Fonts with two clicks
There
is a new button in the 'Font' section of the toolbar labeled 'Set
Defaults'. Clicking this button will launch the Font Setting dialog
screen shown below:
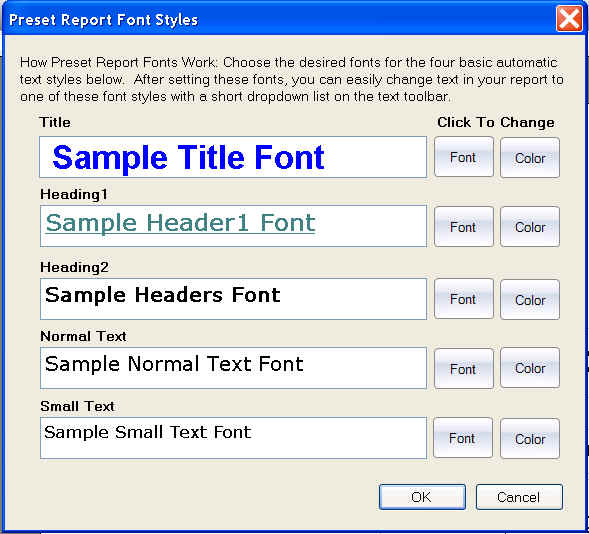
You
can select the font and color for Page Titles, Large Headings, Small Headings,
Normal Text and Small Text. After you have set these once, you can
easily assign the fonts by selecting text and choosing one of the font options
from the new 'Preset fonts' dropdown list in the 'Font' section of the text
toolbar (shown below). No more scrolling through an endless font list,
although it is still there if you need it.
Text
Toolbar Improvements
back
to top
More
descriptive Buttons
We
have tweaked the Text Toolbar to be more intuitive especially for new Users.
Several button now include text descriptions to help them be self
explanatory.
Improved
Right Mouse Click Menus
back
to top
More
intuitive pop up menus
We
have made the right mouse pop up menus more intuitive in that only items that
apply are visible on the menu. We plan to add more right mouse functionality.
See some examples below:
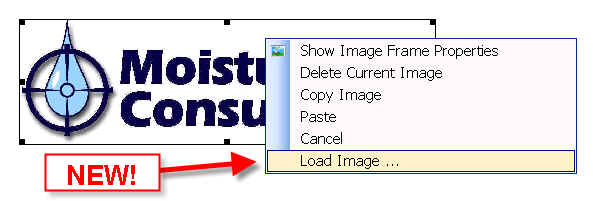
If
images in text pages are right mouse clicked:
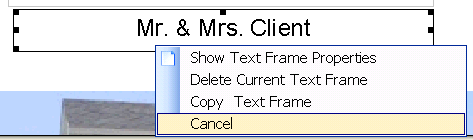
If
textboxes are right mouse clicked:
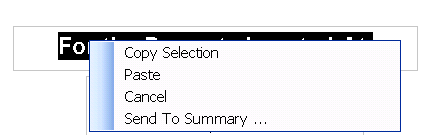
If
text is selected and then right mouse clicked:
New
Text Library Features
back
to top
New
Text Library Dialog Screen
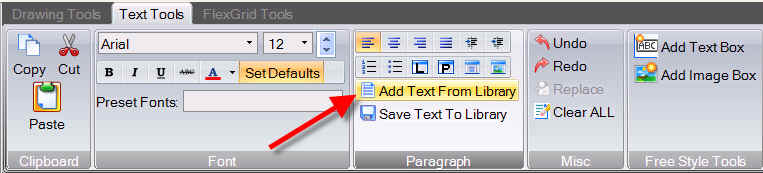
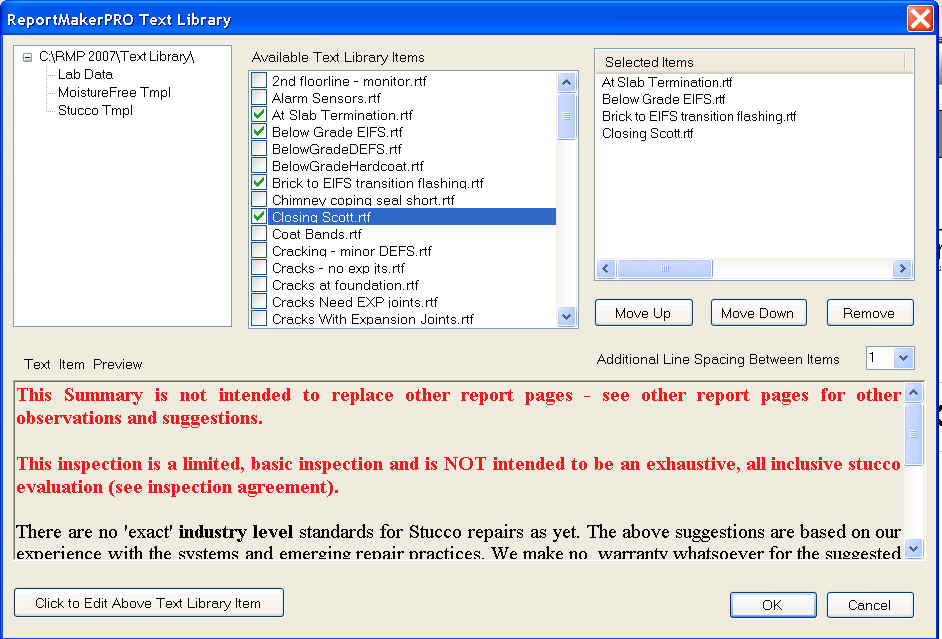
Ever
tried to remember what you named that comment you saved in the Library or
which comment had the text you are looking for? Well now you can preview
the comments before importing them. You can also now select multiple comments
and bring it all at once. You can also edit the comments from the dialog
screen. See new screen shot below:
Individual
Page Headers and Footers
back
to top
Customize
Individual Pages
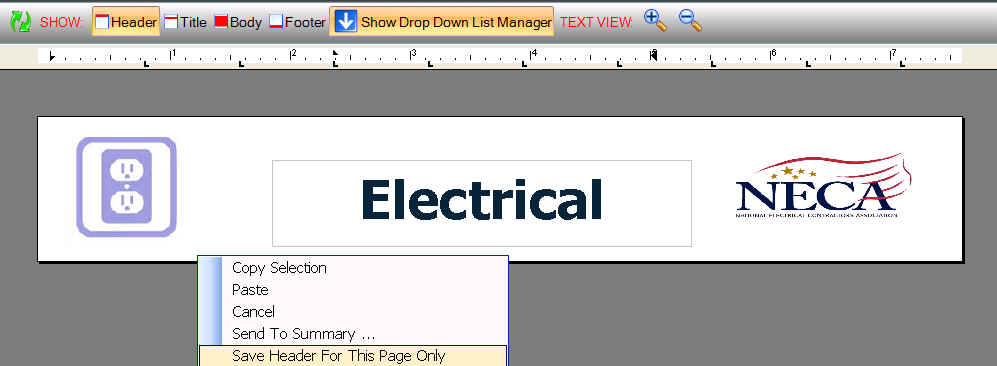
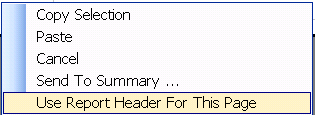
Now
there is an new feature to save a header or footer for 'this page only'.
To use simply display the Header or Footer, set up as desired for that
page. Then right mouse click and select 'Save for This Page Only'
option. To return back to the default report header, right mouse
click on a page header and choose 'Use Report Header For This Page'. See
examples below.
Improved
Image Resolution On Freestyle Pages
back
to top
Customize
Individual Pages
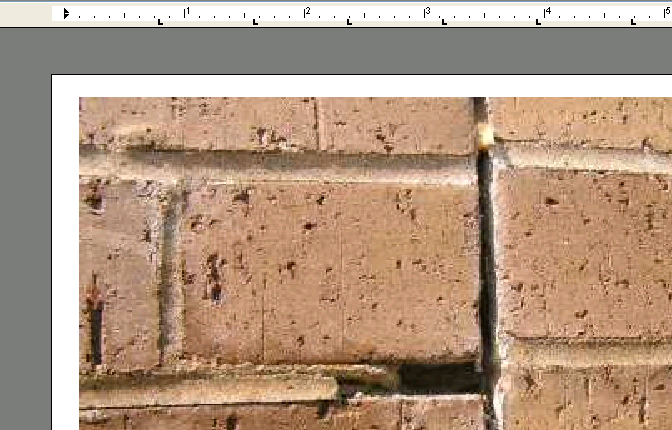
Now
there is a lot better control of image resolution on Freestyle pages. We
have improved the image resolution at the default settings (see
screenshot).
See
Examples Below:
Before:
Image quality at default settings of 80 Image compression and 300 dpi.
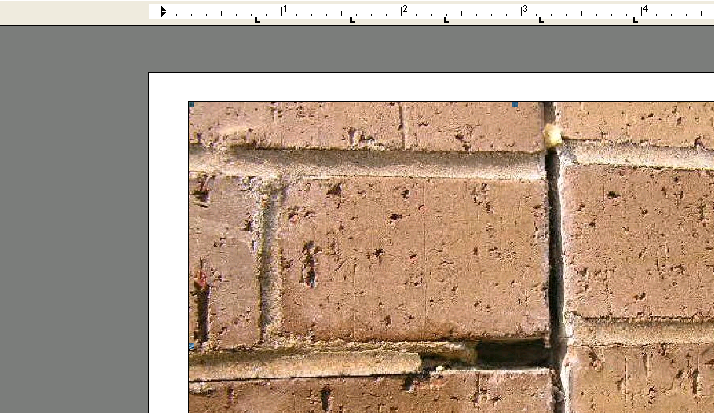
AFTER: Better resolution & detail at same settings
(80 compression and 300 dpi)
Here is screen shot
showing where to set the Freestyle Image qualities. Keep in mind the
higher the image resolution the larger the files and slower times loading,
previewing & printing.
New
Drag and Drop Support for Images
back
to top
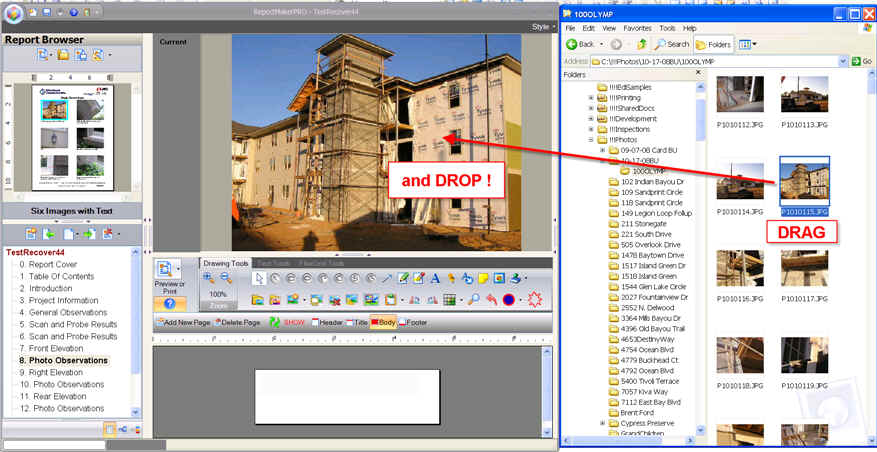
By
Popular Request! For those with large or multiple monitors, you
can now open up multiple window explorers in thumbnail view (shown above) and
simply drag the desired image and drop into the image
editing area to load. Great if your photos are in multiple project
folders! Drag from as many windows explorers as desired. There
is a catch for Window 7 & Windows 8: Windows UAC security
prevents windows explorer from dragging into a more privileged application
(such as ReportMakerPRO). You must either temporarily disable UAC (not
best idea) or get a windows explorer alternative such as FreeCommander (worked
well in our tests).
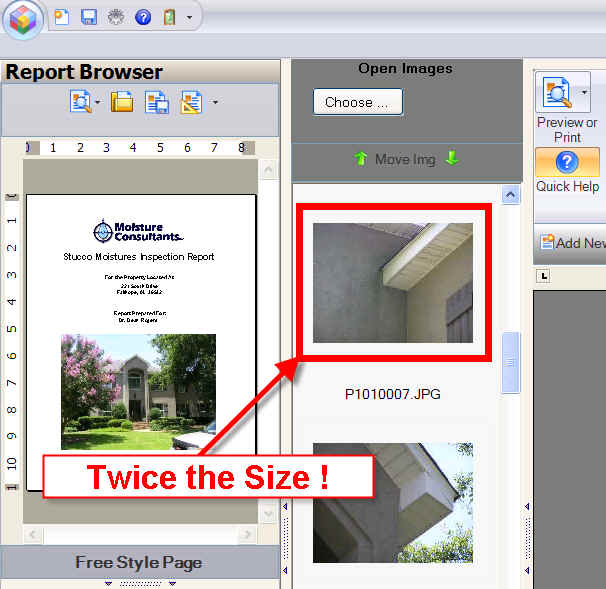
Large
thumbnail display option
back
to top
The
image viewer now has an option to 'Show Large Thumbails' (see sample
below). To select the option, open the ReportMakerPRO Settings dialog
screen and check the 'Show Large Thumbnails' checkbox (see below). A little
help for those of us with older eyes. You can also HOLD DOWN the right
mouse button over a thumbnail to see a large preview screen of the image.
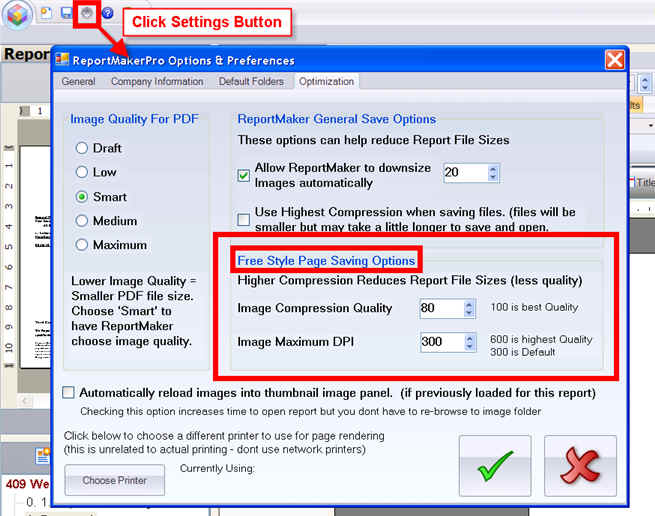
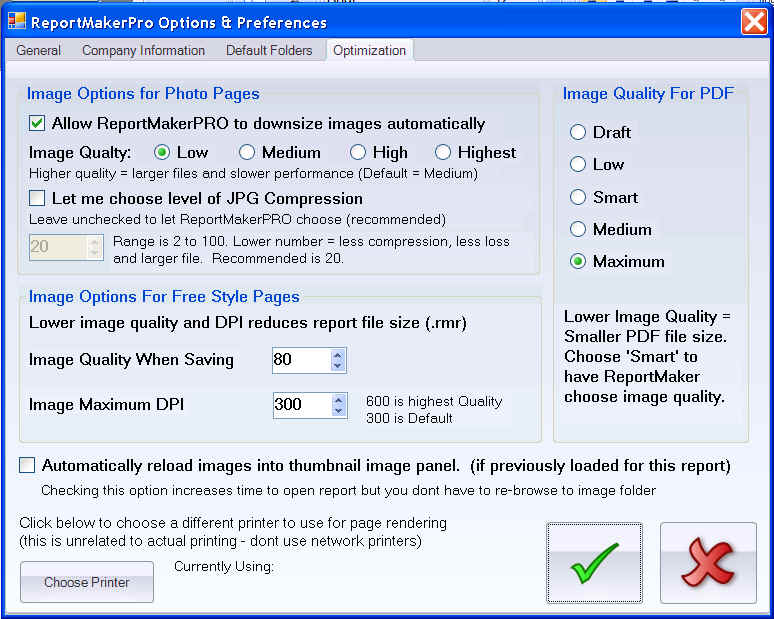
New
Image Resolution Options
back
to top
We
have added more options for image optimization. You can choose to use
original camera resolution (no optimization) or select from Low, Medium, High
& Highest Quality.
-
Low
= 640 X 480 Resolution
-
Medium
= 960 X 640 Resolution
-
High
= 1280 X 960 Resolution
-
Highest
= 1600 X 1280 Resolution
We
have also reworked the Optimization tab in the Preference screen to be more
intuitive and self explanatory (see below). Higher the quality the crisper
the images but the larger the file and slower the performance. You
can also elect to take control of Jpg Compression which also effects image file
size and quality (for advanced users only). 2 is the best quality while
100 is the most compression. Default is 20.
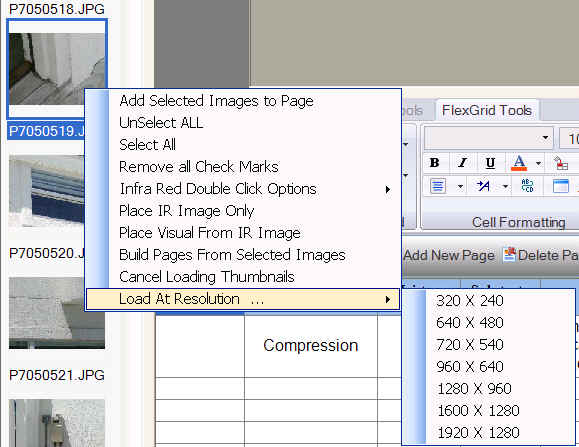
We have also added the feature to load any selected image(s)
at several resolutions. This is useful if you want to have the photos
default to 'Low' resolution but load a particular image at a higher
resolution. Simply select desired image(s) in the thumbnail browser, then
right mouse click and choose "Load At Resolution ..." and then click
desired resolution (see below). This will load the selected images at the
chosen resolution without changing your default resolution settings for loading
images.
Portrait
Image Layout Support
back
to top
We
are adding portrait image support to most page layouts. This new feature
is tricky so we expect we will need to tweak. Let us know how its
working.
Border
Frame Option for Photos
back
to top
You
can now add a border frame around photos. To select the option open up
the ReportMakerPRO settings screen and check the 'Place Borders Around Photos'
check box on the General Tab. You can also choose the border thickness.
Grow
And Shrink Option for Photos
back
to top
This
is the introduction of a new feature to help optimize space on a page.
For now it is limited to the 'One Image with Table' page layout. We will
be adding the feature to additional layouts. With the option turned on
the size of the Photo will automatically be sized to fit in all of the
available space not used by the flexgrid at the bottom. See examples
below. To select the option open up the ReportMakerPRO settings
screen and check the 'Allow Photo Sizes to Grow & Shrink as Space
Permits'.
Normal Photo
Sizing
Grow & Shrink Option On
New
Support For .PNG & .WMF Image Formats
back
to top
We
are adding support for these image formats. Portable Network Graphics (.png)
image format is used a lot with websites. Windows Meta File (.wmf) image
formats are used a lot for clip art and diagrams.
Back
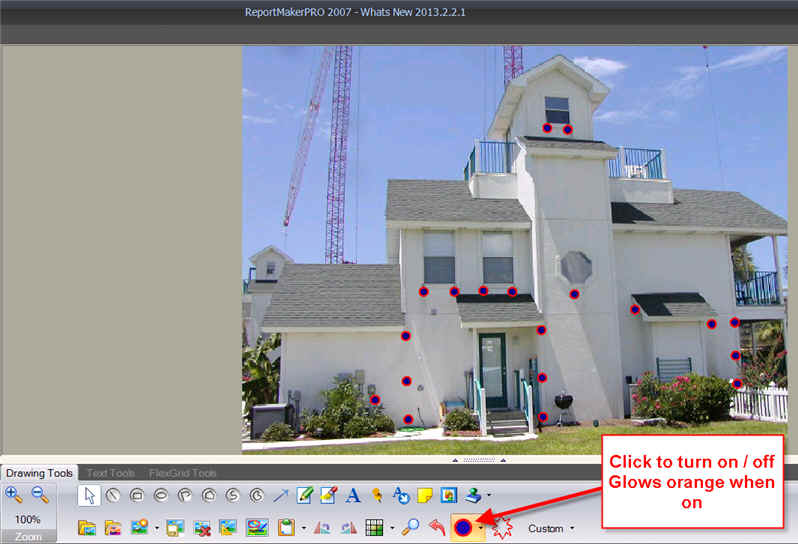
by popular demand: Probe Marker Drawing Tool
back
to top
Click
to turn on / off. Once the feature is on (glows orange) on you simply
click anywhere you want the marker drawn. Three sizes available.
See images below.
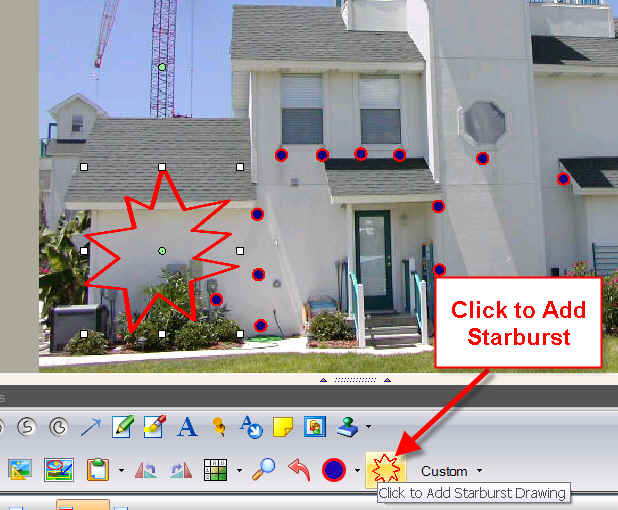
Also
New Starburst Drawing. Simply click and a starburst will be added to the
image. You can move and resize after drawn.
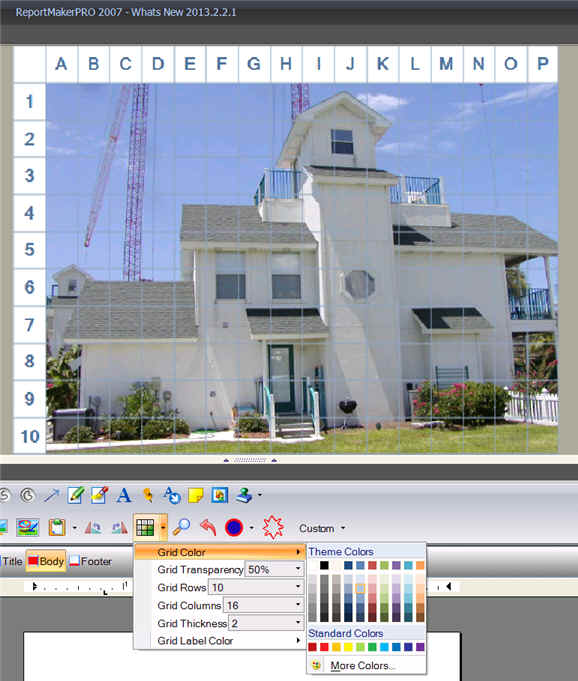
New
Grid Overlay Options
back
to top
The
Grid Overlay drawing tools has been expanded to give you more options. Set the
number of rows and columns and line thickness. Choose a percent of
transparency which provides option for a very 'soft' grid overlay (shown
below). Also choose grid and label colors. Improved to draw more
consistently regardless of image resolution. Simply click the dropdown
arrow next to the grid button to access new options (see below)
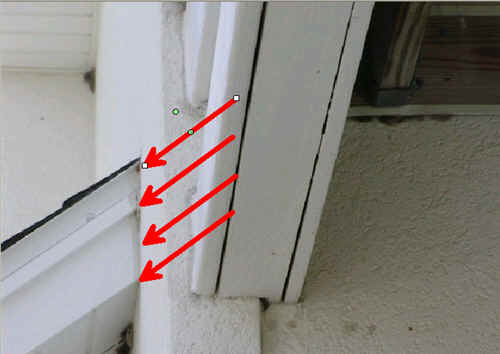
New
Drawing Duplication Features
back
to top
After
you have added a drawing to an image, you can duplicate any drawing by
selecting the drawing, holding down the cntrl key and clicking where you
desire a duplicate (see below arrows). This works with any drawing including
text drawings. You can also duplicate text drawing while automatically
incrementing by selecting the text drawing, holding down the shift key and
clicking where you desire the new incremented drawing. For example
Photo1 becomes Photo2, Item A becomes Item B. It will work with
just numbers or letters ie A will become B. See Examples below:
New
Fluke InfraRed Features
back
to top
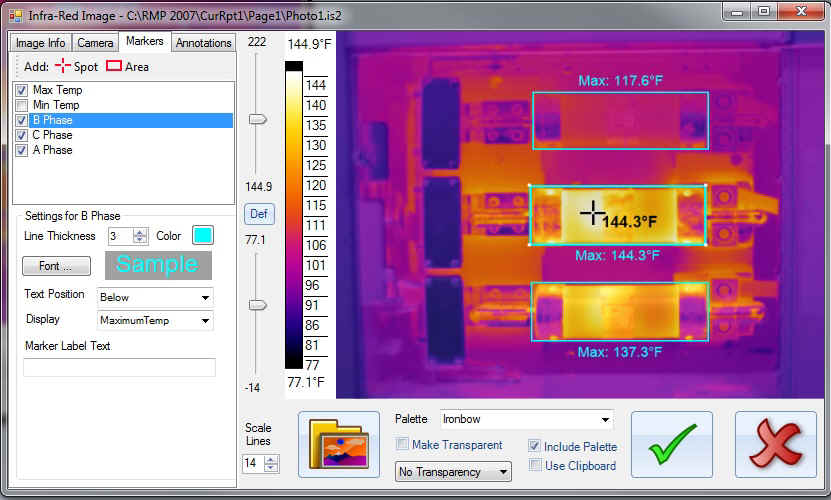
Now
the Fluke InfraRed Editor will load temperature sensitive markers set in the
camera. You can change the colors, line thickness, text placement and
temperature function. Available markers are Spot and Area markers.
You can select Max temp, Min temp, Avg temp. You can also now choose the
number of temp lines for the pallet scale.
Automatic
Report Recovery From Crashes
back
to top
Improved
handling of Crashes
Improper
Antivirus Settings have been known to cause unexpected Crashes with
ReportMakerPRO. We have changed the way ReportMakerPRO does some things
to make crashes less likely. We have also added code to automatically
recover a report if it gets corrupted because of a Antivirus caused crash.
If ReportMakerPRO performs this kind of recovery then you will be notified
with a pop up message that lets you know what occurred. It is still
important to get your antivirus setting correct, but now you won't loose the
whole report. Support can help get your antivirus settings
correct.
We
have also worked on known crash causing bug issues and have added code to
'shield' errors from causing hard crashes. Please let us know about any
crashes so we can address appropriately.
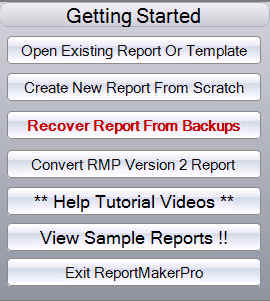
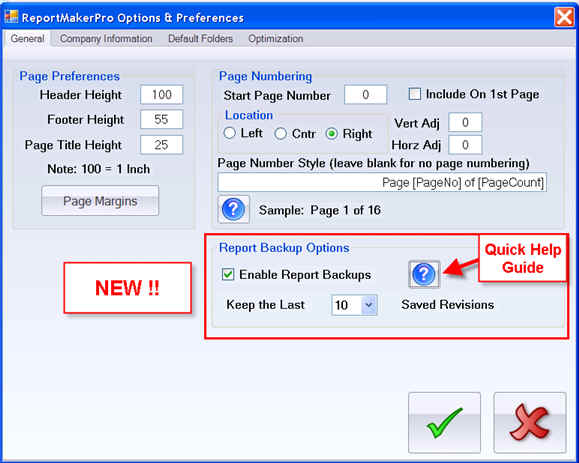
Report
Backups - Recover Recent Report Features
If
for any reason a crash occurs we have added new features to recover a recent
report . You can recover the very last report that was open or select
from a time stamped list of the last 30 saved revisions. No more loosing work because you forgot to save, your key wasn't
plugged in, or there's a power glitch or battery dies, or a crash
happens. This new feature does a very good job of recovering up to the
very last item you were working on! The feature is very easy to
use. The recover report feature is available on the Getting Started menu
(shown below). Report backup options are set on the general tab of
ReportMakerPRO options and preferences dialog screen. You can view
detailed instructions by click the quick help button (shown below).
Miscellaneous
back
to top
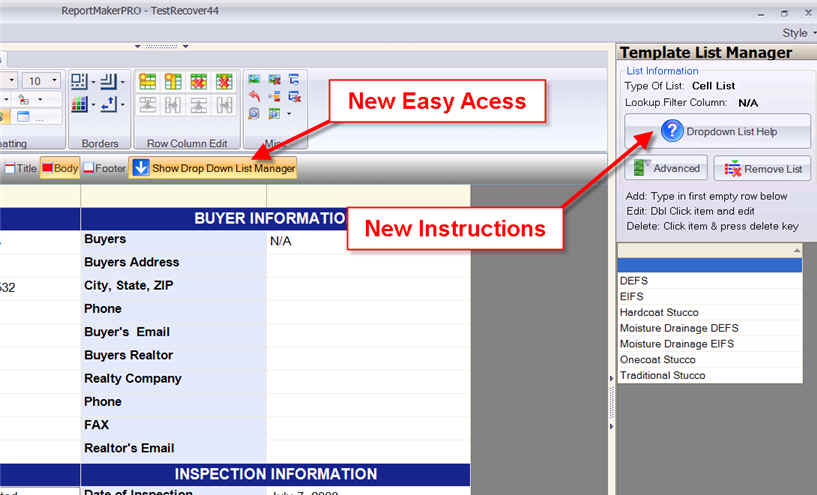
There
is a new Drop Down List Manager Button (see below) that is visible when
working on a flexgrid that will open up the list manager. There is also
new quick help with instructions on using and working with dropdown lists (see
below).
More
Quick Help
 We
are adding more Quick Help instructions throughout ReportMakerPRO screens
to provide instructions for various features. There are several new
topics in this release and we will be adding more with every
release. If you see a help button (shown to left), click to show the
Quick Help for that feature.
We
are adding more Quick Help instructions throughout ReportMakerPRO screens
to provide instructions for various features. There are several new
topics in this release and we will be adding more with every
release. If you see a help button (shown to left), click to show the
Quick Help for that feature.
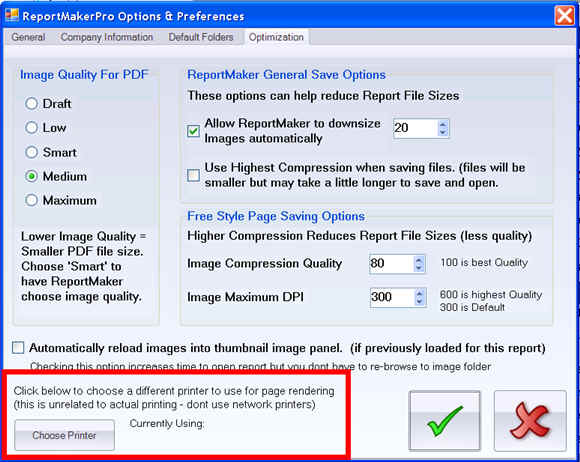
Performance
Improvement
If
your default printer is a network printer, it can slow ReportMakerPRO
down. ReportMakerPRO uses the 'default' printer driver to draw or
'render' the report pages. We have now added a setting to allow you to
choose any printer for ReportMakerPRO to use to render the report
pages. This will not effect your printer settings at all, but may
increase ReportMakerPRO performance. We suggest always using a 'local'
printer or we suggest using the 'Primo PDF' printer if installed. You
can experiment with the settings to see if you can improve
performance. The setting may not take effect until you restart
ReportMakerPRO. The new setting can be found on the Optimization
Tab of the ReportMakerPRO Options and Preferences Dialog screen (see below).
Automatic
Update Notifications
Gold
Support Subscribers will receive automatic notification of new available
updates. A download link will be displayed on the ReportMakerPRO
startup screen.